shef - bake state machines in ROS
Disclaimer
I built shef when I was working on final round of the NASA Space Robotics Challenge Phase 2 (although the name “shef” was coined in retrospect). Frankly, I haven’t tested it outside of that project and there is a possibility that it might contain some typos or missing dependencies as a result of pulling it out of the codebase. However, my hope is that someone out there who is trying to quickly prototype state machines in ROS might find it useful. I don’t plan on maintaining this piece of code but if you add any exciting features to it that others may find useful, feel free to send a merge request!
shef is a wrapper around smach, built with the intention of simplifying the process of creating and running complex hierarchical state machines in ROS.
Let’s look at an example:
Suppose you want to create a simple state machine that sequentially executes three states: StateA, StateB and StateC.
More information on states is provided later, but for now know that creating a state is as simple as implementing a behaviour function as follows:
1
2
3
4
5
6
7
8
9
10
11
12
13
14
15
16
17
18
19
20
21
22
    from state_machine.base._base_state import BaseState

    class StateA(BaseState):
        def __init__(self, name, tree, outcome, conditions):
            super().__init__(name, tree, outcome, conditions)

        def behaviour(self):
            print("Executing StateA")

    class StateB(BaseState):
        def __init__(self, name, tree, outcome, conditions):
            super().__init__(name, tree, outcome, conditions)

        def behaviour(self):
            print("Executing StateB")

    class StateC(BaseState):
        def __init__(self, name, tree, outcome, conditions):
            super().__init__(name, tree, outcome, conditions)

        def behaviour(self):
            print("Executing StateC")
Now, having implemented each of these states, the next step is to define how the program must transition between them. For that, you’ll need to implement something called a transition state. In our case, a transition state that executes StateA, StateB and StateC sequentially might look something like this:
1
2
3
4
5
6
7
8
9
10
    from state_machine.states.base._base_transition_state import BaseTransitionState

    class CustomTransitionState(BaseTransitionState):
        def __init__(self, name, tree, outcomes, conditions, ledger):
            super().__init__(name, tree, outcomes, conditions, ledger)
            self.index = -1

        def next_state(self):
            self.index += 1
            return self.child_states[self.index]
Finally, all we need to do is hook all of these individual states up into a state machine which can then be executed. That is done by defining a recipe file as:
1
2
3
4
5
6
7
8
9
10
    root:
      type: SimpleStateMachine
      transition_state: CustomTransitionState
      child_states:
        state_a:
          type: StateA
        state_b:
          type: StateB
        state_c:
          type: StateC
and… that’s it! Everything else is taken care of for you by shef. shef will parse this recipe file, construct a smach state machine under-the-hood and execute the states as per the transitions you define (to run the program modify the provided main.py). It’s that simple!
Note that this was a very rudimentary example by design. shef allows you to do a lot more complex stuff with relative ease. This includes
- running states in parallel
- nesting state machines
- synchronisation e.g. “do not execute stateX while stateY is running” or “wait for stateB to finish before executing stateA” etc.
- preempt execution
- externally force state transition
and more. Keep reading for details!
Table of Contents
State
A state is the simplest element of the state machine which “does something” when its behaviour function is executed. In order to define your own state you will need to inherit the BaseState class and implement the behaviour function.
Here is an example of a custom state class:
1
2
3
4
5
6
7
8
9
10
11
12
13
14
15
16
17
18
19
20
import rospy
from state_machine.base._base_state import BaseState

class BusyWait(BaseState):
    """
    A simple state that infinitely busy-waits unless preempted.
    """

    def __init__(self, name, tree, outcome):
        super().__init__(name, tree, outcome)

    def behaviour(self):
        rospy.loginfo(
            "Running the BusyWait. \
            Expected behaviour is to infinitely wait unless pre-emptively killed."
        )
        while True:
            if self.preempt_requested():
                return
            rospy.sleep(1.0)
and that is it really.
YSK
-
Each state has a
self.data_storedictionary object which is shared across all states (including the transition state) within a SimpleStateMachine. If you want to share data or pass messages to the sibling states, you can simply add it to thedata_store. -
The state’s data is persistent. In other words, any variables that you declare in the constructor of the state class will “remember” their value if the state machine enters the same state again. If you want to reset these parameters every time this state is executed, you should either initialise them in the
behaviourfunction or reset them in theself.tear_downfunction which is inherited fromBaseState. -
Inside the
behaviourfunction, you should have some logic to exit the function ifself.preempt_requested()flag returns true. See the code above for example. This is required to preempt the state. If your state takes a long time to execute, you should be frequently monitoring this flag (and not just once).
State Machine
A state machine is a container for a set of child states. There are two kinds of state machines that are implemented in shef by default:
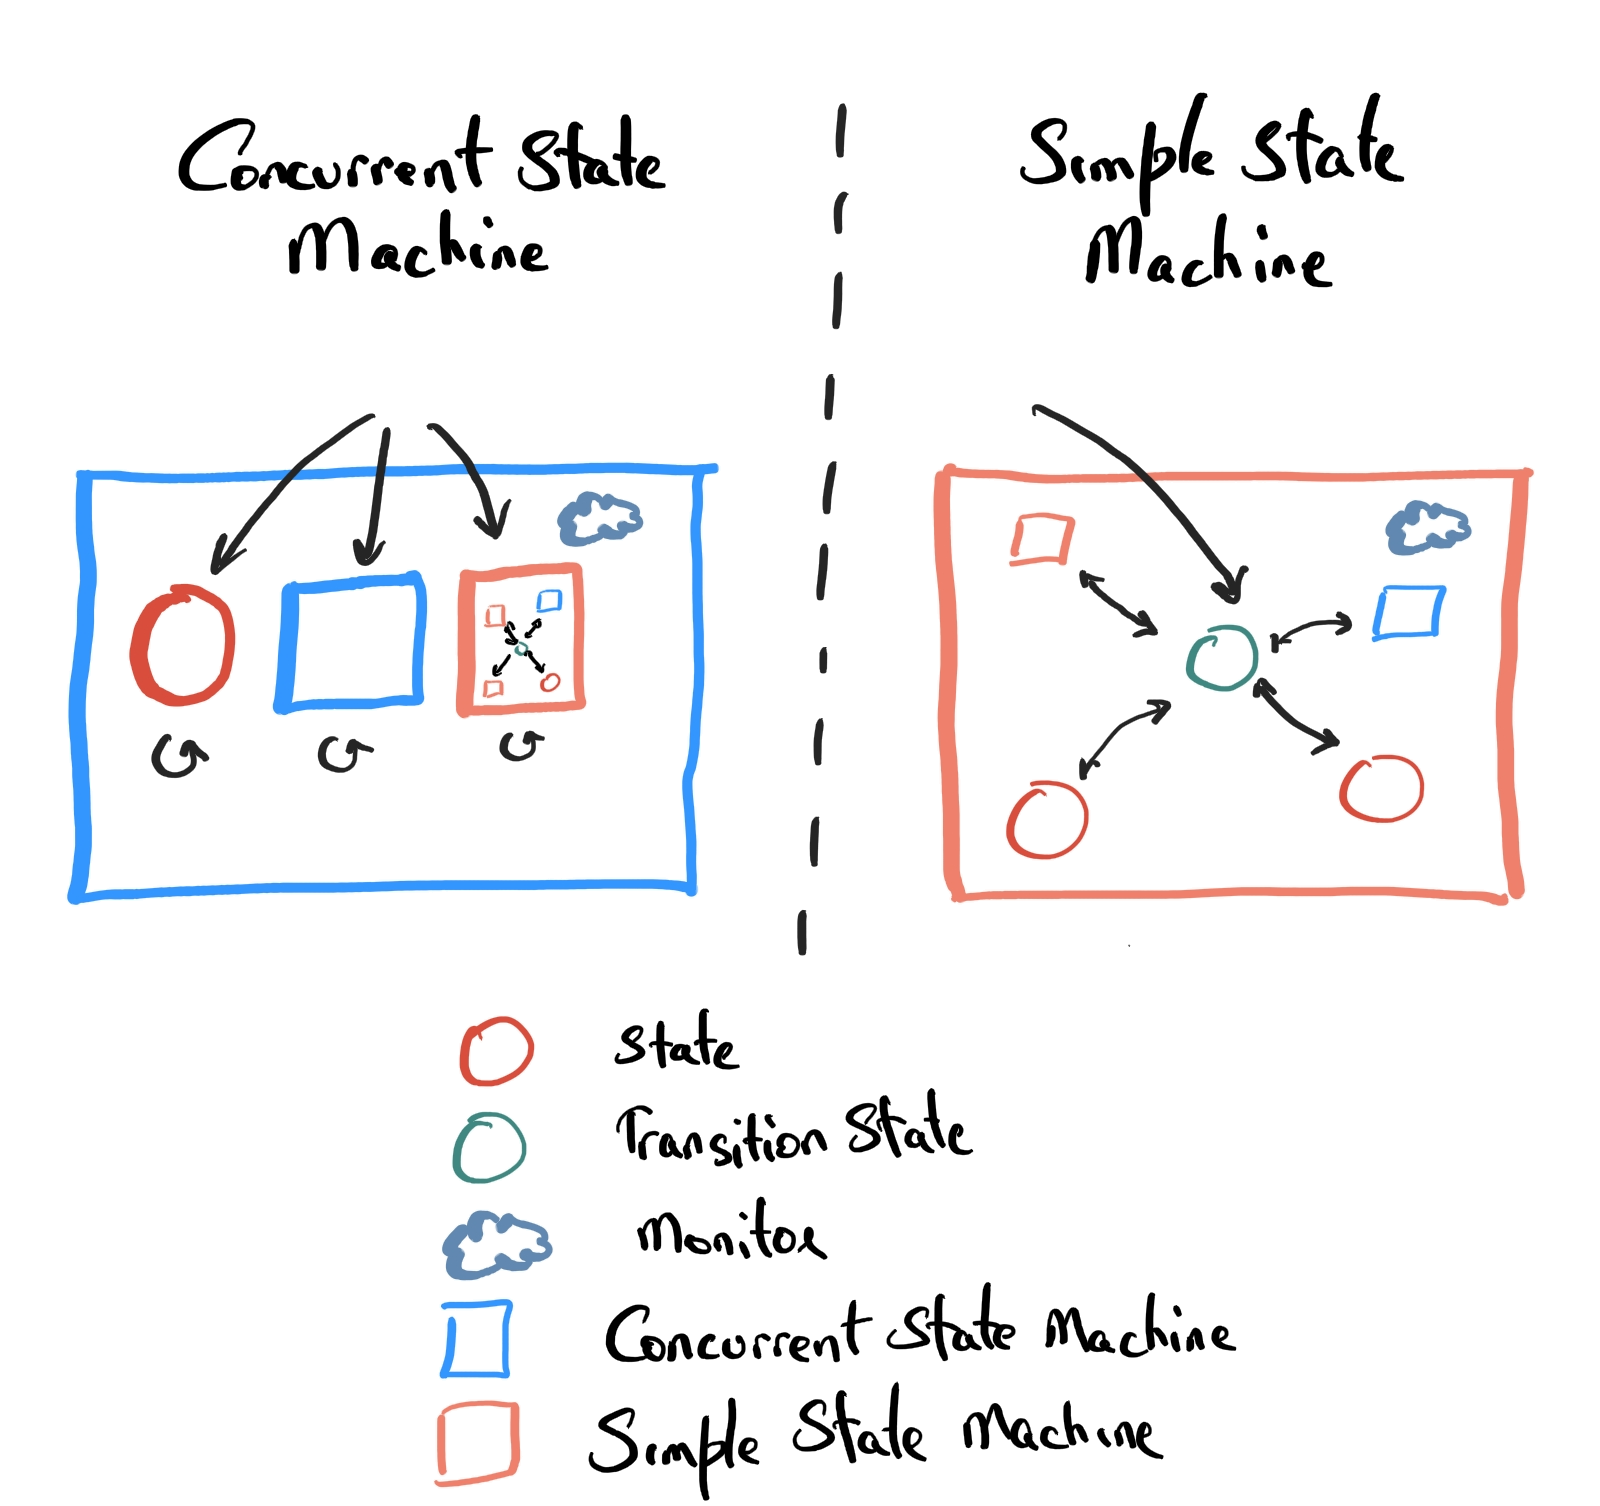
ConcurrentStateMachine
The concept of a concurrent state machine is quite straightforward. It runs all of its child states in concurrence (“in parallel”) and exits once all of them have finished executing.
SimpleStateMachine
Despite the name, a simple state machine is a bit more complex than a concurrent state machine. The idea for this state machine is to execute its child states one at a time based on some pre-defined logic (transitions). Rather than allowing any child state to transition to any other child states, there is a transition state which all other states are connected to. It is the responsibility of this transition state to manage the control flow of the program.
YSK
- As evident from the diagram above, it is possible to nest state machines.
- In a SimpleStateMachine, there will only be one active state at a time.
- Both SimpleStateMachine and ConcurrentStateMachine come with a monitor. This monitor sets up a rostopic and constantly listens to it for any messages. A state machine can be preempted or forced to execute a particular state by publishing a message to its corresponding monitor.
Transition State
In order to define your own state you will need to inherit the BaseTransitionState class and implement the next_state function.
Here is an example of a custom transition state class:
1
2
3
4
5
6
7
8
9
10
11
12
13
14
15
from state_machine.base._base_transition_state import BaseTransitionState

class SequentialTransitionState(BaseTransitionState):
    """
    Transition state to sequentially execute all the child states.
    """

    def __init__(self, name, tree, outcomes, ledger):
        super().__init__(name, tree, outcomes, ledger)

    def next_state(self):
        index = 0
        if self.last_state is not None:
            index = self.child_states.index(self.last_state) + 1
        return self.child_states[index]
The logic to decide which state to go to next should reside inside the next_state function. In the example above, the transition state sequentially executes the states in the order they were defined in the recipe file.
YSK
-
Each transition state has
self.child_stateswhich is a list of strings representing the name of the states inside the SimpleStateMachine. To “go to” a particular state next, simply return the name of that state (string) from thenext_statefunction. Note that the last element ofchild_statesis special in that return this will exit the SimpleStateMachine. -
The transition state also keeps track of the last state that was executed inside the
self.last_statevariable. If the logic of where to go next relies on what you executed last, this variable would be useful. Note that its value isNoneby default if the program has yet to enter any of the child states. -
Unlike a state, the
self.tear_downfunction gets executed when the entire SimpleStateMachine is exited (and not every time the transition state exits, which wouldn’t add a lot of value). Any tear down functionality should go inside this function e.g. resetting any member variables.
Recipes
Recipes are probably the main contribution of shef. They allow us to quickly define a finite state machine which is then parsed and executed automatically when the program is run. A recipe file is nothing but a simple .yml file with information about constructing a state machine.
Here is an example:
1
2
3
4
5
6
7
8
9
10
11
12
13
    root:
      type: SimpleStateMachine
      transition_state: SequentialTransitionState
      child_states:
        child_1:
            type: ConcurrentStateMachine
            child_states:
                parallel_1:
                    type: DummyState
                parallel_2:
                    type: DummyState
        child_2:
          type: DummyState
Explanation:
This recipe file will create a state machine called root which is of type SimpleStateMachine and has 2 child states: child_1 and child_2. The SequentialTransitionState dictates the control flow between these child states. child_1 in itself is a state machine of type ConcurrentStateMachine while child_2 is just a regular state of type DummyState.
Defining your own recipes
Recipe files follow a tree structure and writing one is quite straightforward. There are only a handful of things to keep in mind:
1. <state names> vs <keywords> vs <class names>
- There are a few words that have special meaning. We’ll call them
<keywords>. In the example abovetype,transition_stateandchild_statesare all keywords. In addition,importis also a keyword. - A
<state name>is, well, the name of a state or state machine being defined. In the example aboveroot,child_1,child_2,parallel_1andparallel_2are all state names. These can be whatever you want. typeandtransition_statekeywords have values, which are<class names>. The parser will use this to instantiate a class with the matching name. Therefore, it is important to make sure that the<class name>is spelt correctly and there is in fact a class defined with the corresponding name. Note: this class must be exposed in the/state_machine/states/__init__.pyfile.
2. type
There are only 2 types of state machines: SimpleStateMachine and ConcurrentStateMachine. For both of these, you will need to define the child_states. In addition, for a SimpleStateMachine, you will also need to specify the transition_state.
Everything else that is not a state machine, is a simple state. For these you only need to define the type as <class name>. These states cannot have child_states.
3. Each recipe file defines a single top-level state machine
Going back to the idea of recipe files following a tree structure, each file must only define a single state or state machine at the top level. This is akin to the idea of a tree having a single root.
Here is an example of what you cannot do:
1
2
3
4
5
6
7
8
9
10
11
12
    my_custom_state_machine_1:
      type: SimpleStateMachine
      transition_state: SequentialTransitionState
      child_states:
        child_1:
          type: DummyState
    my_custom_state_machine_2:
      type: SimpleStateMachine
      transition_state: SequentialTransitionState
      child_states:
        child_1:
          type: DummyState
On the other hand, here are some examples of valid recipes:
1
2
3
4
5
6
7
8
9
    my_custom_state_machine:
      type: ConcurrentStateMachine
      child_states:
        child_1:
          type: DummyState
        child_2:
          type: DummyState
        child_3:
          type: DummyState
1
2
    my_custom_state:
        type: DummyState
1
2
3
4
5
6
7
8
9
10
11
12
13
14
15
    my_top_state_machine:
      type: ConcurrentStateMachine
      child_states:
        my_custom_state_machine_1:
          type: SimpleStateMachine
          transition_state: SequentialTransitionState
          child_states:
            child_1:
              type: DummyState
        my_custom_state_machine_2:
          type: SimpleStateMachine
          transition_state: SequentialTransitionState
          child_states:
            child_1:
              type: DummyState
4. Each child state of a given state machine must have a unique <state name>
The following recipe is not okay
1
2
3
4
5
6
7
    my_custom_state_machine:
      type: ConcurrentStateMachine
      child_states:
          child_1:
            type: DummyState
          child_1:
            type: DummyState
but this one is (even though two states share the same state name)
1
2
3
4
5
6
7
8
9
10
11
12
13
    my_custom_state_machine:
      type: ConcurrentStateMachine
      child_states:
        child_1:
          type: ConcurrentStateMachine
          child_states:
            same_name:
              type: DummyState
        child_2:
          type: ConcurrentStateMachine
          child_states:
            same_name:
              type: DummyState
5. Indentation matters
After every <state name>: and child_states: you’ll need to indent. This is standard yaml stuff.
6. Nesting recipe files
Because of the indentation and nesting state machines, some of the recipe files can get really hairy. To allow for sanity and reusability, you can nest recipe files using the import keyword,
Consider the following recipe file:
1
2
3
4
5
6
7
8
    # filename: child_recipe.yml
    i_am_root:
      type: ConcurrentStateMachine
      child_states:
        child_1:
          type: DummyState
        child_2:
          type: DummyState
which is imported inside another recipe file as:
1
2
3
4
5
6
    # filename: parent_recipe.yml
    root:
      type: ConcurrentStateMachine
      child_states:
        i_am_not_root:
          import: child_recipe
The above is the equivalent of:
1
2
3
4
5
6
7
8
9
10
11
    # filename: same_as_parent_recipe.yml
    root:
      type: ConcurrentStateMachine
      child_states:
        i_am_not_root:
          type: ConcurrentStateMachine
          child_states:
            child_1:
              type: DummyState
            child_2:
              type: DummyState
Notice how the state name i_am_root disappears in the same_as_parent_recipe.yml.
If you run child_recipe.yml as the main recipe, the top level state machine will have the name i_am_root but if you run parent_recipe.yml, the imported state machine has the name i_am_not_root.
Note: When importing a recipe file into another, you must define a <state name> for it in the parent recipe file. For instance, here is an example of something you cannot do.
1
2
3
4
5
    # filename: bad_parent_recipe.yml
    root:
      type: ConcurrentStateMachine
      child_states:
        import: child_recipe
This is mandated to ensure that you can import the same recipe file multiple times within the same state machine e.g.
1
2
3
4
5
6
7
8
    # filename: good_parent_recipe.yml
    root:
      type: ConcurrentStateMachine
      child_states:
        child_1:
          import: child_recipe
        child_2:
          import: child_recipe
Monitor
Each simple state machine and concurrent state machine comes with a monitor state. As mentioned earlier, the monitor state sets up a unique rostopic for each state machine and constantly listens to it for any messages. The idea is that a given state machine can be preempted or forced to execute a particular state by publishing a message to this monitor.
Note: Preemption applies to both simple state machine and concurrent state machine. However, forced child state execution applies only to simple state machine.
Consider the following recipe file:
1
2
3
4
5
6
7
8
9
10
11
12
13
14
15
16
17
  root:
    type: ConcurrentStateMachine
    child_states:
      parallel_1:
        type: SimpleStateMachine
        transition_state: LoopTransitionState
        child_states:
          child_1:
            type: DummyState
          child_2:
            type: DummyState
          child_3:
            type: DummyState
          child_4:
            type: DummyState
      parallel_2:
        type: SomeOtherState
Executing this recipe file will set up the following rostopics
/root_monitor/root/parallel_1_monitor
Let’s say you want to force parallel_1 to execute child_3 except when it is executing child_1 (which for some reason you do not want to interrupt), you can do so using:
1
2
3
4
5
6
7
8
9
10
11
12
13
14
15
16
  import rospy
  from state_machine.states.base._forced_transition_message import ForcedTransitionMessage

  parallel_1_publisher = rospy.Publisher(
              "/root/parallel_1_monitor",
              String,
              queue_size=10,
          )

  force_parallel_1_message = ForcedTransitionMessage(
      access_control="ignore_if_in_given_states",
      potential_current_states=["child_1"],
      target_state="child_3",
  )

  parallel_1_publisher.publish(force_parallel_1_message.to_json())
Alternatively, let’s say you wanted to preempt/kill the root state machine, you could do so using:
1
2
3
4
5
6
7
8
9
10
11
12
13
14
15
16
17
  import rospy
  from state_machine.states.base._forced_transition_message import ForcedTransitionMessage

  root_publisher = rospy.Publisher(
              "/root_monitor",
              String,
              queue_size=10,
          )

  kill_state_machine_message = ForcedTransitionMessage(
      access_control="preempt_if_in_given_states",
      potential_current_states=[],
      target_state="",
      kill_state_machine=True,
  )

  root_publisher.publish(kill_state_machine_message.to_json())
Note the access control "preempt_if_in_given_states" vs "ignore_if_in_given_states". We’ve already seen the use of "ignore_if_in_given_states" which is used to avoid interrupting the state machine if it is executing given potential_current_states. The use of "preempt_if_in_given_states" is quite the opposite. Here the state machine will only be interrupted if it is executing one of the given potential_current_states.
Synchronisation
Often times when executing a finite state machine there is a need to synchronise various states that are running in concurrence/parallel. For instance, imagine there are two robots performing some task that takes an unpredictable amount of time. Further imagine that these robots need to access a resource after completing the task except only one robot may access the resource at any given time. To ensure that both the robots do not access the resource at the same time, we can write the following recipe:
1
2
3
4
5
6
7
8
9
10
11
12
13
14
15
16
17
18
19
20
21
22
23
24
25
26
27
  root:
    type: ConcurrentStateMachine
    child_states:
      robot_1:
        type: SimpleStateMachine
        transition_state: SequentialTransitionState
        child_states:
          task:
            type: TaskActionState
          access_resource:
            type: AccessResourceActionState
            conditions:
              pre-execution: [
                ["/root/robot_2/access_resource", "INACTIVE"]
              ]
      robot_2:
        type: SimpleStateMachine
        transition_state: SequentialTransitionState
        child_states:
          task:
            type: TaskActionState
          access_resource:
            type: AccessResourceActionState
            conditions:
              pre-execution: [
                ["/root/robot_1/access_resource", "INACTIVE"]
              ]
Here the state access_resource for each robot has a pre-execution condition that makes sure that a given state (of the other robot) is INACTIVE. shef will continue to busy-wait until this condition is true before entering the state.
YSK
- There are two types of conditions:
pre-executionandpost-execution. Their behaviour is exactly what their name suggests. - Each
pre-executionorpost-executioncondition is a actually a list of multiple states to wait-for. - You can condition on each state being
ACTIVEorINACTIVE, or for them toENTERorEXIT.
Final Remarks
Phew! There is a lot to process, and honestly this post doesn’t cover everything there is to know about shef. I encourage you to play around with it and I hope that this post was enough to get you started.
Until next time!